OpenAI Agent SDK documentation을 읽고 핵심 내용과 사용 예제에 대해서 정리합니다.
Agent를 개발하기 위한 도구로 이전에는 langchain, langgraph가 자주 사용되어 왔지만, 최근 들어서는 OpenAI Agent SDK가 자주 사용 및 언급되고 있습니다. OpenAI Agent SDK는 langgraph에 비해 다른 의존성이 적고, 사용 방법이 복잡하지 않으며, 기존 파이썬 문법에서 벗어나지 않는 특징을 가지고 있습니다. 따라서 저 또한 앞으로 Agent 관련된 코딩을 수행하게 되면 OpenAI Agent SDK 기반으로 작성하려고 하며, 이를 위해서 아래에 관련 핵심 개념들을 정리하게 되었습니다.
OpenAI Agent SDK의 핵심 설계 원칙은 '경량성'과 'Python-First' 접근 방식입니다. 이는 개발자가 복잡하고 새로운 추상화 개념을 배울 필요 없이, 최소한의 핵심 요소들과 기존 파이썬 언어의 특징을 활용하여 직관적으로 에이전트 시스템을 구축할 수 있도록 돕습니다. 실제로 아래에서 자세한 개념 정리와 사용 예제를 확인해보면서 OpenAI Agent SDK를 익혀보도록 합시다.
1. Quick Start
기본적인 사용 예시부터 확인해보겠습니다. 각 용어에 대한 자세한 이해는 지금은 넘어가셔도 좋습니다.
먼저, 에이전트를 정의합니다. (예제는 OpenAI Agent SDK docs에서 가져왔습니다.)
from agents import Agent

agent = Agent(
    name="Math Tutor",
    instructions="You provide help with math problems. Explain your reasoning at each step and include examples",
)

history_tutor_agent = Agent(
    name="History Tutor",
    handoff_description="Specialist agent for historical questions",
    instructions="You provide assistance with historical queries. Explain important events and context clearly.",
)

math_tutor_agent = Agent(
    name="Math Tutor",
    handoff_description="Specialist agent for math questions",
    instructions="You provide help with math problems. Explain your reasoning at each step and include examples",
)
중심이 되는 traige_agent를 정의하고, 해당 에이전트에 handsoff를 정의합니다.
triage_agent = Agent(
    name="Triage Agent",
    instructions="You determine which agent to use based on the user's homework question",
    handoffs=[history_tutor_agent, math_tutor_agent]
)
워크플로우(즉, 중심이 되는 traige_agent)를 Runner.run을 통해 실행합니다.
from agents import Runner

async def main():
    result = await Runner.run(triage_agent, "What is the capital of France?")
    print(result.final_output)
혹시 입력과 출력에 대한 유효성 검증을 하고싶다면, guardrail을 추가해봅시다.
from agents import GuardrailFunctionOutput, Agent, Runner
from pydantic import BaseModel


class HomeworkOutput(BaseModel):
    is_homework: bool
    reasoning: str

guardrail_agent = Agent(
    name="Guardrail check",
    instructions="Check if the user is asking about homework.",
    output_type=HomeworkOutput,
)

async def homework_guardrail(ctx, agent, input_data):
    result = await Runner.run(guardrail_agent, input_data, context=ctx.context)
    final_output = result.final_output_as(HomeworkOutput)
    return GuardrailFunctionOutput(
        output_info=final_output,
        tripwire_triggered=not final_output.is_homework,
    )

triage_agent = Agent(
    name="Triage Agent",
    instructions="You determine which agent to use based on the user's homework question",
    handoffs=[history_tutor_agent, math_tutor_agent],
    input_guardrails=[
        InputGuardrail(guardrail_function=homework_guardrail),
    ],
)
2. Basic Concepts
이 파트에서는 OpenAI Agent SDK를 사용하기 위해 알아야 할 가장 기본 요소들에 대해서 소개합니다.
Agents
Agent는 가장 핵심적인 구성 요소로, instructions과 tools로 구성된 LLM을 의미합니다.
- name: 에이전트를 식별하는 필수 문자열입니다. 로깅, 디버깅, tracing 등에서 식별자로 사용됩니다.
- instructions: 에이전트의 페르소나, 목표, 제약 조건 등을 정의하는 시스템 프롬프트입니다.
- model: 사용할 LLM 모델입니다.
# 간단한 에이전트는 이름과 지침만으로 생성할 수 있습니다.
from agents import Agent

math_tutor_agent = Agent(
    name="Math Tutor",
    instructions="You provide help with math problems. Explain your reasoning at each step and include examples.",
    model="gpt-4o" # 사용할 모델을 명시적으로 지정
)
다음과 같은 추가적인 기능들도 있습니다.
output_type파라미터를 사용하면 에이전트가 단순한 텍스트가 아닌, Pydantic 모델이나 dataclass와 같이 구조화된 데이터를 생성하도록 할 수 있습니다.instructions파라미터에 문자열 대신 함수를 전달하는 것도 가능합니다. 현재 컨텍스트에 따라 시스템 프롬프트를 동적으로 생성하여 에이전트가 상황에 맞게 대응하도록 만들고 싶다면 이런 방식을 사용하시면 됩니다.clone()메서드를 사용하면 기존 에이전트를 복제하여 약간의 변형을 가한 새로운 에이전트를 손쉽게 생성할 수도 있습니다.
Runner
Runner 클래스는 에이전트의 실행 흐름을 관리하는 구성 요소입니다. 즉, 정의된 에이전트에 생명을 불어넣는 엔진 역할을 합니다. Runner.run()을 호출하면 자동으로 실행되는 'Agent loop'는 OpenAI Agent SDK의 핵심적인 작동 방식이며 과정은 다음과 같습니다.
- Runner는 현재까지의 메시지 기록과 함께 LLM을 호출합니다.
- LLM은 응답을 반환하며, 이 응답에는 tool call이나 handoff 요청이 포함될 수 있습니다.
- 만약 tool call이 있다면, Runner는 해당 도구를 실행하고 그 결과를 메시지 기록에 추가한 뒤, 다시 1번 단계로 돌아갑니다.
- 이 루프는 "최종 출력(final output)"이 생성되면 종료됩니다.
루프가 종료되는 조건은 두 가지입니다.
output_type이 설정된 경우엔, LLM이 해당 구조화된 타입과 일치하는 응답을 생성하면 루프가 종료됩니다.output_type이 설정되지 않은 경우(일반 텍스트)엔, tool call이나 handoff가 포함되지 않은 첫 번째 LLM 응답이 최종 출력으로 간주되어 루프가 종료됩니다.
Runner는 비동기 애플리케이션을 위한 Runner.run()과 동기 애플리케이션을 위한 Runner.run_sync() 실행 모드를 제공합니다.
# Runner는 최종 출력이 나올 때까지 에이전트 루프를 자동으로 처리합니다.
from agents import Runner

# 위에서 정의한 math_tutor_agent를 가정합니다.
user_query = "What is the Pythagorean theorem?"

# 비동기 실행
result = await Runner.run(math_tutor_agent, user_query)

print(result.final_output)
이처럼 agent loop를 추상화한 것은 OpenAI Agent SDK의 핵심적인 가치입니다. 개발자가 직접 이런 loop를 구축하는 대신, 에이전트에 필요한 도구와 출력 타입을 설정하기만 하면 Runner가 나머지 복잡한 과정을 알아서 처리합니다.
전체 응답이 생성될 때까지 기다리는 것보다, 토큰 단위로 응답을 스트리밍하는 것도 가능합니다. Runner.run_streamed() 메서드는 agent loop 중에 발생하는 텍스트 조각(delta), tool call 정보, 최종 출력 등 다양한 유형의 이벤트를 비동기적으로 생성하는 제너레이터(async generator)를 반환합니다.
# 스트리밍은 사용자에게 실시간 피드백을 제공합니다.
# 아래는 일반적인 스트리밍 패턴에 기반한 개념적 예제입니다.

async for event in Runner.run_streamed(agent, "Tell me a long story."):
    if event.type == 'text_delta':
        print(event.delta, end="", flush=True)
    elif event.type == 'final_output':
        print("\n--- Story Complete ---")
아래와 같이 정리해볼 수 있겠습니다.
runner.run(): 비동기 실행runner.run_sync(): 동기 실행runner.run_streamed(): 비동기 실행 + 스트리밍 지원
RunResult
Runner 호출의 결과물은 단순한 문자열이 아니라, 풍부한 정보를 담고 있는 RunResult 객체입니다.
- **
result.final_output**을 통해 에이전트의 최종 응답을 얻을 수 있습니다. result.final_output_as(YourPydanticModel)메서드를 사용하면 구조화된 데이터를 안전하게 파싱하고 검증하여 가져올 수 있습니다.
RunResult 객체에는 최종 출력뿐만 아니라, 실행 과정에서 발생한 모든 중간 단계의 tool call과 LLM의 생각 과정이 포함되어 있어 디버깅과 로깅에 유용합니다.
추가적으로, RunResultBase.to_input_list() 사용하면 과거 conversation 들을 다음 turn의 인풋으로 쉽게 넣어줄 수 있습니다.
messages = []
messages.append({"role": "user", "content": "Remember the number 7814."})
response = runner.run(messages)
messages = runner.to_input_list(response)

messages.append({"role": "user", "content": "Multiply the last number by 103.8"})
response = runner.run(messages)
print(response)  # 이전 숫자를 기억하고 계산 수행
3. Tools & Context
이 파트에서는 에이전트가 외부와 상호작용하고 필요한 정보에 접근할 수 있는 능력을 부여하는 방법에 대해서 살펴봅니다.
Tools
Tool는 에이전트가 단순한 텍스트 생성을 넘어 웹 검색, 데이터베이스 접근, 외부 API 호출과 같은 의미 있는 행동을 취할 수 있게 해줍니다.
Tool을 만드는 가장 기본적인 방법은 파이썬 함수에 @function_tool 데커레이터를 사용하는 것입니다. Open AI Agent SDK는 아래의 과정을 자동으로 수행합니다. 따라서 type hint와 docstring을 잘 작성해주는 것이 중요합니다.
- Type hint로부터 JSON 스키마 생성
- 함수의 docstring을 파싱하여 tool 설명으로 사용
- Pydantic을 이용한 입력값 검증
# @function_tool 데코레이터는 파이썬 함수를 즉시 도구로 변환합니다.
from agents import function_tool

@function_tool
def get_weather(city: str) -> str:
    """Returns the current weather for a specified city."""
    # 실제 애플리케이션에서는 이 부분에서 날씨 API를 호출합니다.
    return f"The weather in {city} is sunny and 25°C."
agent = Agent(
name="날씨비서",
instructions="너는 날씨 정보를 제공하는 도우미야.",
tools=[get_weather]
)이 외에도 아래와 같은 기능들도 존재합니다.
WebSearchTool,CodeInterpreterTool,FileSearchTool과 같이 OpenAI 서버에서 직접 실행되는 Hosted Tools들도 제공됩니다. 별도의 설정 없이 즉시 사용할 수 있습니다.agent.as_tool()메서드를 사용하면 에이전트를 tool로도 사용할 수 있습니다.tool_choice파라미터를 사용하면 에이전트가 특정 tool을 반드시 사용하도록("required"), 사용하지 않도록("none"), 또는 지정된 도구만 사용하도록("get_weather") 강제할 수 있습니다.
Context: Local Context
Context는 의존성 주입 도구(dependency-injection tool)입니다. 이것은 Runner.run()에 전달하는 객체이며, 모든 agent, tool, handoff 등에 전달되고, 에이전트 실행에 필요한 의존성이나 상태 정보들을 보관하는 공간 역할을 합니다. Context로는 아무 Python 객체나 제공할 수 있습니다.
@dataclass
class UserContext:
    name: str
    uid: str
    is_pro_user: bool

    async def fetch_purchases() -> list[Purchase]:
        return ...

agent = Agent[UserContext](
    ...,
)
Local context는 RunContextWrapper 클래스와 그 안의 context 속성을 통해 나타납니다. 동작 방식은 다음과 같습니다.
- 파이썬 객체를 생성합니다. 일반적 패턴은 dataclass나 Pydantic 객체를 사용하는 것입니다.
- 그 객체를 다양한 run 메서드(예:
Runner.run(..., context=whatever))에 전달합니다. - 모든 tool 호출, 라이프사이클 hook 등에서는
RunContextWrapper[T]타입의 래퍼 객체가 전달되며, 여기서T는 우리가 생성한 컨텍스트 객체 타입을 의미합니다. 실제 객체에는wrapper.context로 접근하면 됩니다.
주어진 agent 실행에서 모든 agent, tool 함수, 라이프사이클 등은 반드시 같은 종류의 context를 사용해야 합니다. 아래 예시를 통해 이해해보겠습니다.
import asyncio
from dataclasses import dataclass

from agents import Agent, RunContextWrapper, Runner, function_tool

@dataclass
class UserInfo:
    name: str
    uid: int

@function_tool
async def fetch_user_age(wrapper: RunContextWrapper[UserInfo]) -> str:
    """Fetch the age of the user. Call this function to get user's age information."""
    return f"The user {wrapper.context.name} is 47 years old"

async def main():
    user_info = UserInfo(name="John", uid=123)

    agent = Agent[UserInfo](
        name="Assistant",
        tools=[fetch_user_age],
    )

    result = await Runner.run(
        starting_agent=agent,
        input="What is the age of the user?",
        context=user_info,
    )

    print(result.final_output)
    # The user John is 47 years old.

if __name__ == "__main__":
    asyncio.run(main())
Context: Agent/LLM context
LLM이 호출될 때, 모델이 볼 수 있는 유일한 데이터는 대화(conversation) 이력에서 옵니다. 즉, LLM이 새로운 데이터를 활용하려면 반드시 그 데이터가 대화 이력에 남을 방식으로 제공해야 합니다. 방법은 다음과 같습니다.
- Agent의
instructions에 시스템 프롬프트로써 추가. 시스템 프롬프트는 고정 문자열일 수도 있고, context를 받아서 문자열을 반환하는 동적 함수일 수도 있습니다. Runner.run을 호출할 때input(입력 메시지)에 포함시키기.- 여러 tool을 통해 노출하기. LLM이 필요한 시점에 데이터를 요청하도록 할 수 있습니다.
4. Advanced Topics
이 파트에서는 복잡한 멀티 에이전트 시스템을 구축하고, 이들이 안전하고 신뢰성 있게 작동하도록 보장하는 방법을 다룹니다.
Session
LLM은 본질적으로 상태가 없기 때문에(stateless), 대화의 맥락을 유지하기 위해서는 매번 이전 대화 기록을 함께 전달해야 합니다. 물론 .to_input_list()를 사용하는 방법도 있지만, session을 사용하는 방법도 있습니다.
Sessions는 여러 Runner.run() 호출에 걸쳐 대화 기록을 자동으로 관리해주는 OpenAI Agent SDK의 내장 솔루션입니다. 이를 통해 개발자는 번거롭고 오류가 발생하기 쉬운 수동 상태 관리 과정에서 벗어날 수 있습니다.
Runner는 실행 전에 세션에서 이전 기록을 가져오고, 실행 후에는 새로운 상호작용 내용을 다시 세션에 저장합니다. SQLiteSession이나 SQLAlchemySession과 같은 Session 객체를 생성하여 Runner에 전달하는 방식으로 간단하게 사용할 수 있습니다.
# 세션은 실행 간의 대화 기록을 자동으로 유지하고 가져옵니다.
from agents import Agent, Runner, SQLiteSession

assistant = Agent(name="Assistant", instructions="You are a helpful assistant.")
# 고유한 대화 ID와 연결된 세션 생성
session = SQLiteSession("user_conversation_42")

# 첫 번째 턴
await Runner.run(assistant, "My name is Alex.", session=session)

# 두 번째 턴 - 에이전트가 이름을 기억합니다.
result = await Runner.run(assistant, "What is my name?", session=session)
print(result.final_output) # 예상 출력: "Your name is Alex."
Handsoff
Handsoff는 한 에이전트가 특정 작업을 더 전문화된 다른 에이전트에게 위임(delegate)하는 메커니즘입니다. 이는 모듈화된 멀티 에이전트 시스템을 구축하기 위한 핵심 패턴입니다.
Handsoff는 부모 에이전트에게 특별한 종류의 tool로써 표현됩니다. LLM이 이 tool를 호출하기로 결정하면, SDK는 이를 가로채 대화의 제어권과 기록을 목표 에이전트에게 이전합니다.
Agent 생성자의 handoffs 리스트를 사용하여 에이전트가 수행할 수 있는 잠재적인 handoff를 정의할 수 있습니다.
# triage_agent는 전문화된 에이전트로의 핸드오프를 구성합니다.
history_tutor_agent = Agent(name="History Tutor", instructions="...")
math_tutor_agent = Agent(name="Math Tutor", instructions="...")

triage_agent = Agent(
    name="Triage Agent",
    instructions="You determine which agent to use based on the user's homework question.",
    handoffs=[history_tutor_agent, math_tutor_agent]
)

# Runner는 LLM의 결정에 따라 핸드오프를 자동으로 처리합니다.
result = await Runner.run(triage_agent, "Who was Julius Caesar?")
# 결과는 history_tutor_agent로부터 생성됩니다.
handoff() 유틸리티 함수를 사용하면 on_handoff 콜백(전달 전 데이터 가져오기)이나 input_filter(다음 에이전트로 전달되는 기록 정리)와 같은 고급 사용자 정의가 가능합니다.
from agents import Agent, handoff, RunContextWrapper

def on_handoff(ctx: RunContextWrapper[None]):
    print("Handoff called")

agent = Agent(name="My agent")

handoff_obj = handoff(
    agent=agent,
    on_handoff=on_handoff,
    tool_name_override="custom_handoff_tool",
    tool_description_override="Custom description",
)
Handoff가 발생하면, 마치 새로운 에이전트가 대화를 인계받아 전체 이전 대화 이력을 모두 볼 수 있게 됩니다. 만약 이러한 동작을 변경하고 싶다면, input_filter를 설정할 수도 있습니다. input filter는 기존 입력을 HandoffInputData 형태로 받아 새로운 HandoffInputData를 반환해야 하는 함수입니다.
일반적으로 자주 쓰이는 패턴(예: 대화 이력에서 모든 tool 호출을 제거하는 것 등)은 agents.extensions.handoff_filters에 이미 구현되어 있습니다.
from agents import Agent, handoff
from agents.extensions import handoff_filters

agent = Agent(name="FAQ agent")

handoff_obj = handoff(
    agent=agent,
    input_filter=handoff_filters.remove_all_tools,
)
Guardrails
Guardrails은 에이전트의 입력과 출력에 대한 유효성 검사를 수행하는 함수로, 에이전트의 주 로직과 병렬로 실행됩니다.
"Tripwire" 메커니즘: guardrails의 조건이 충족되면(예: 유해 콘텐츠 감지), "Tripwire"가 작동하여 즉시 예외를 발생시키고 실행을 중단시킵니다.
@input_guardrail: 첫 번째 에이전트가 실행되기 전에 실행되어 초기 사용자 입력을 검증합니다.@output_guardrail: 마지막 에이전트가 실행된 후에 실행되어 최종 응답을 사용자에게 보내기 전에 검증합니다.
# 가드레일은 입력과 출력을 검증하는 강력한 방법을 제공합니다.
from agents import Agent, input_guardrail, GuardrailFunctionOutput, Runner
from agents.exceptions import InputGuardrailTripwireTriggered

@input_guardrail
async def profanity_check_guardrail(ctx, agent, input_data) -> GuardrailFunctionOutput:
    is_inappropriate = "badword" in str(input_data).lower()
    return GuardrailFunctionOutput(
        output_info={"reason": "Profanity detected"},
        tripwire_triggered=is_inappropriate,
    )

safe_agent = Agent(
    name="Safe Agent",
    instructions="You are a helpful and friendly assistant.",
    input_guardrails=[profanity_check_guardrail]
)

try:
    await Runner.run(safe_agent, "This is a badword query.")
except InputGuardrailTripwireTriggered as e:
    print(f"Guardrail tripped! Reason: {e.output_info}")
5. Utilities
이 파트에서는 에이전틱 시스템을 구축하고 유지보수하기 위한 실용적인 도구와 기술을 살펴봅니다.
Tracing
복잡한 에이전트 상호작용은 디버깅하기 어려울 수 있습니다. 이런 경우에 tracing을 통해 에이전트 워크플로우를 시각화하할 수 있습니다. Tracing은 기본적으로 활성화되어 있으며, 실행 결과는 OpenAI Traces 대시보드에서 확인할 수 있습니다.
아래처럼trace() 함수를 사용하여 여러 실행을 단일 트레이스로 그룹화하는 고급 기능도 지원합니다.
from agents import Agent, Runner, trace

async def main():
    agent = Agent(name="Joke generator", instructions="Tell funny jokes.")

    with trace("Joke workflow"):
        first_result = await Runner.run(agent, "Tell me a joke")
        second_result = await Runner.run(agent, f"Rate this joke: {first_result.final_output}")
        print(f"Joke: {first_result.final_output}")
        print(f"Rating: {second_result.final_output}")
REPL utility
UI를 구축하지 않고 에이전트의 대화 능력을 빠르고 상호작용적으로 테스트하고 싶은 경우에는, run_demo_loop 유틸리티를 사용해볼 수 있습니다. 아래 코드를 실행시 터미널에서 대화형 채팅 세션을 시작할 수 있으며, 대화 기록을 자동으로 처리하고 에이전트의 출력을 스트리밍합니다.
# REPL 유틸리티는 빠르고 상호작용적인 테스트에 완벽합니다.
import asyncio
from agents import Agent, run_demo_loop

async def main():
    agent = Agent(name="Assistant", instructions="You are a helpful assistant.")
    await run_demo_loop(agent)

if __name__ == "__main__":
    asyncio.run(main())
draw_graph
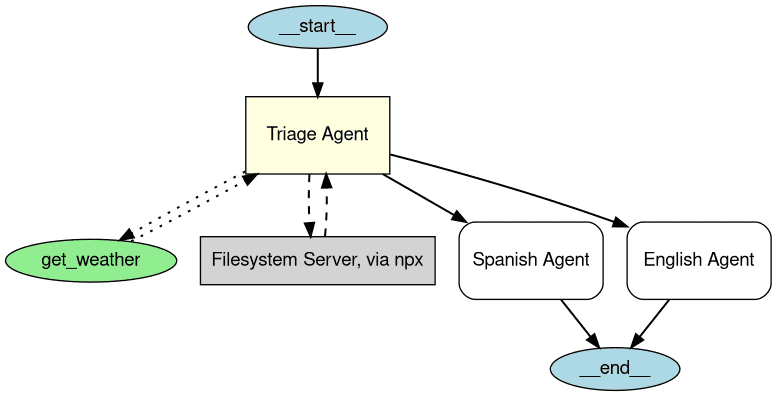
멀티 에이전트 시스템이 커질수록 agent, tool, handoff 등의 관계를 파악하기 어려워집니다. draw_graph 유틸리티는 Graphviz를 사용하여 에이전트와 그 연결 관계를 시각적인 다이어그램으로 생성해줍니다. pip install "openai-agents[viz]"로 필요한 패키지를 설치한 후, 간단한 코드를 통해 그래프를 생성할 수 있습니다.
import os

from agents import Agent, function_tool
from agents.mcp.server import MCPServerStdio
from agents.extensions.visualization import draw_graph

@function_tool
def get_weather(city: str) -> str:
    return f"The weather in {city} is sunny."

spanish_agent = Agent(
    name="Spanish agent",
    instructions="You only speak Spanish.",
)

english_agent = Agent(
    name="English agent",
    instructions="You only speak English",
)

current_dir = os.path.dirname(os.path.abspath(__file__))
samples_dir = os.path.join(current_dir, "sample_files")
mcp_server = MCPServerStdio(
    name="Filesystem Server, via npx",
    params={
        "command": "npx",
        "args": ["-y", "@modelcontextprotocol/server-filesystem", samples_dir],
    },
)

triage_agent = Agent(
    name="Triage agent",
    instructions="Handoff to the appropriate agent based on the language of the request.",
    handoffs=[spanish_agent, english_agent],
    tools=[get_weather],
    mcp_servers=[mcp_server],
)

draw_graph(triage_agent)
https://openai.github.io/openai-agents-python/visualization/
LiteLLM Integration
LitellmModel 클래스를 사용하여 SDK를 Anthropic, Google을 포함한 100개 이상의 다른 LLM에 연결할 수 있습니다.
# SDK는 LiteLLM을 통해 모델에 구애받지 않습니다.
import os
from agents import Agent
from agents.extensions.models.litellm_model import LitellmModel

# LiteLLM 모델 래퍼 구성
claude_model = LitellmModel(
    model="claude-3-opus-20240229",
    api_key=os.environ.get("ANTHROPIC_API_KEY") # 환경 변수에서 키 가져오기
)

claude_agent = Agent(
    name="Claude Assistant",
    instructions="You are a helpful assistant powered by Claude.",
    model=claude_model
)
6. Conclusion
지금까지 OpenAI Agent SDK의 핵심적인 기능들을 살펴보았습니다. 가장 기본적인 Agent와 Runner의 개념부터, 에이전트의 능력을 확장하는 Tools와 Context, 그리고 여러 에이전트가 협력하는 복잡한 시스템을 구축하기 위한 Handoffs와 Guardrails와 같은 고급 기능까지 다루었습니다.
직접 사용해보면서 느끼는 OpenAI Agent SDK의 가장 큰 매력은 복잡한 추상화 대신 친숙한 파이썬 문법과 데코레이터를 기반으로 설계되었다는 점과 개발자들이 최소한의 학습 곡선으로 빠르게 아이디어를 프로토타이핑하고 실제 애플리케이션으로 발전시킬 수 있다는 점인 것 같습니다. 또한 기본 기능들 뿐만 아니라, 개발 과정에서 꼭 필요한 Tracing, REPL, draw_graph와 같은 실용적인 유틸리티 함수들도 모두 존재한다는 점도 큰 장점인 것 같습니다.
혹시 앞으로 에이전틱 워크플로우를 만들 계획이 있으신 분이라면, 위 정리 글을 참고하시면서 OpenAI Agent SDK를 활용하여 에이전트를 구축해보시는 것을 추천드립니다.